Communications - Science teaching
Description of classes given at Campus Pampuri (Bogotá, Colombia) Oct. 2016.
Here I outline the class structure in some more detail, including some improvements and thoughts on the classes for next time.
Making craters - 6 hours in total.
Class I. In this first session we began by talking about the moon. We covered the phases of the moon, formation, craters and seas, rotation around the earth.
- Size and distance of moon. For this activity we had a model earth (on our case a blow up globe) and a smaller plastic ball (of roughly the correct size) for the moon. We asked the kids if the earth is this size, what size would the moon be. We then asked them how far the moon is from the earth if they are both this size, and slowly walked to the other side of the room. For this we used volunteers to hold earth and moon.
- Rotation of the moon around the earth. Here we asked one child to hold the earth and the other the moon. The moon child then had to slowly walk around the earth as the earth child rotated. The Moon could only finish their orbit when the earth had rotated 27 times (swapping the earth child half way through is a good idea). The entire class was then asked to call out the rotations of the earth child as they completed each one. This got the kids excited and worked well in getting them to remember how long it took the moon to orbit the earth.
- Phases of the moon. Here we asked every one to stand in the center of the class room around the earth ball. One of us then orbited around the earth with the moon and a torch.
- Ordering the moon phases. Here we presented each group of children with nine cards each with a showing different lunar phase. For the younger classes it involved just matching the shapes. However for the older classes we drew their attention to the crates on the surface and encouraged them to match the phases using these features i.e. not to mix up the waxing and waning phases.
- This class involved a lot of talking from us, and not a lot of hands-on activities for the children. I think it was quite hard for them to listen to us for that long. After this first class we made a concerted effort to change the format to include more hands on activities split between explanations.
- Spending more time on the phases of the moon would of been helpful, getting the children to draw the phases in order for them to think about the process a little more. This drawing could also be done during the 'Rotation of the moon around the earth' activity. Alternatively activity sheets could be made showing the moon in different positions around the earth, and ask the children to draw the corresponding phases.
- The children enjoyed learning about the formation of the moon.
- Something that also could be included in this class is the concept of orbits, how to get into orbit, how do we get to the moon.
Activities
Thoughts and Improvements
Class II. We began by talking about the formation of the solar system, starting from small grains and building up slowly to asteroids and then planets. Asteroids can tell us a lot about how the solar system was at a very early age. The surface of the earth has undergone a lot of changes that have not occurred in these asteroids. We can find some of these meteorites on the surface of the earth, but can we also learn something about these asteroids from the craters on the moon. How can we test this? For the rest of this class we split the children into research teams making the point that scientists never work alone.
- Making asteroids. We got each group to make a number of asteroids using plasticine, first by breaking them into many small pieces and then very lightly sticking the small pieces together. We encouraged them to make various sizes, some where squeezed lightly, others were kept loosely bound. We looked at images of known asteroids for inspiration.
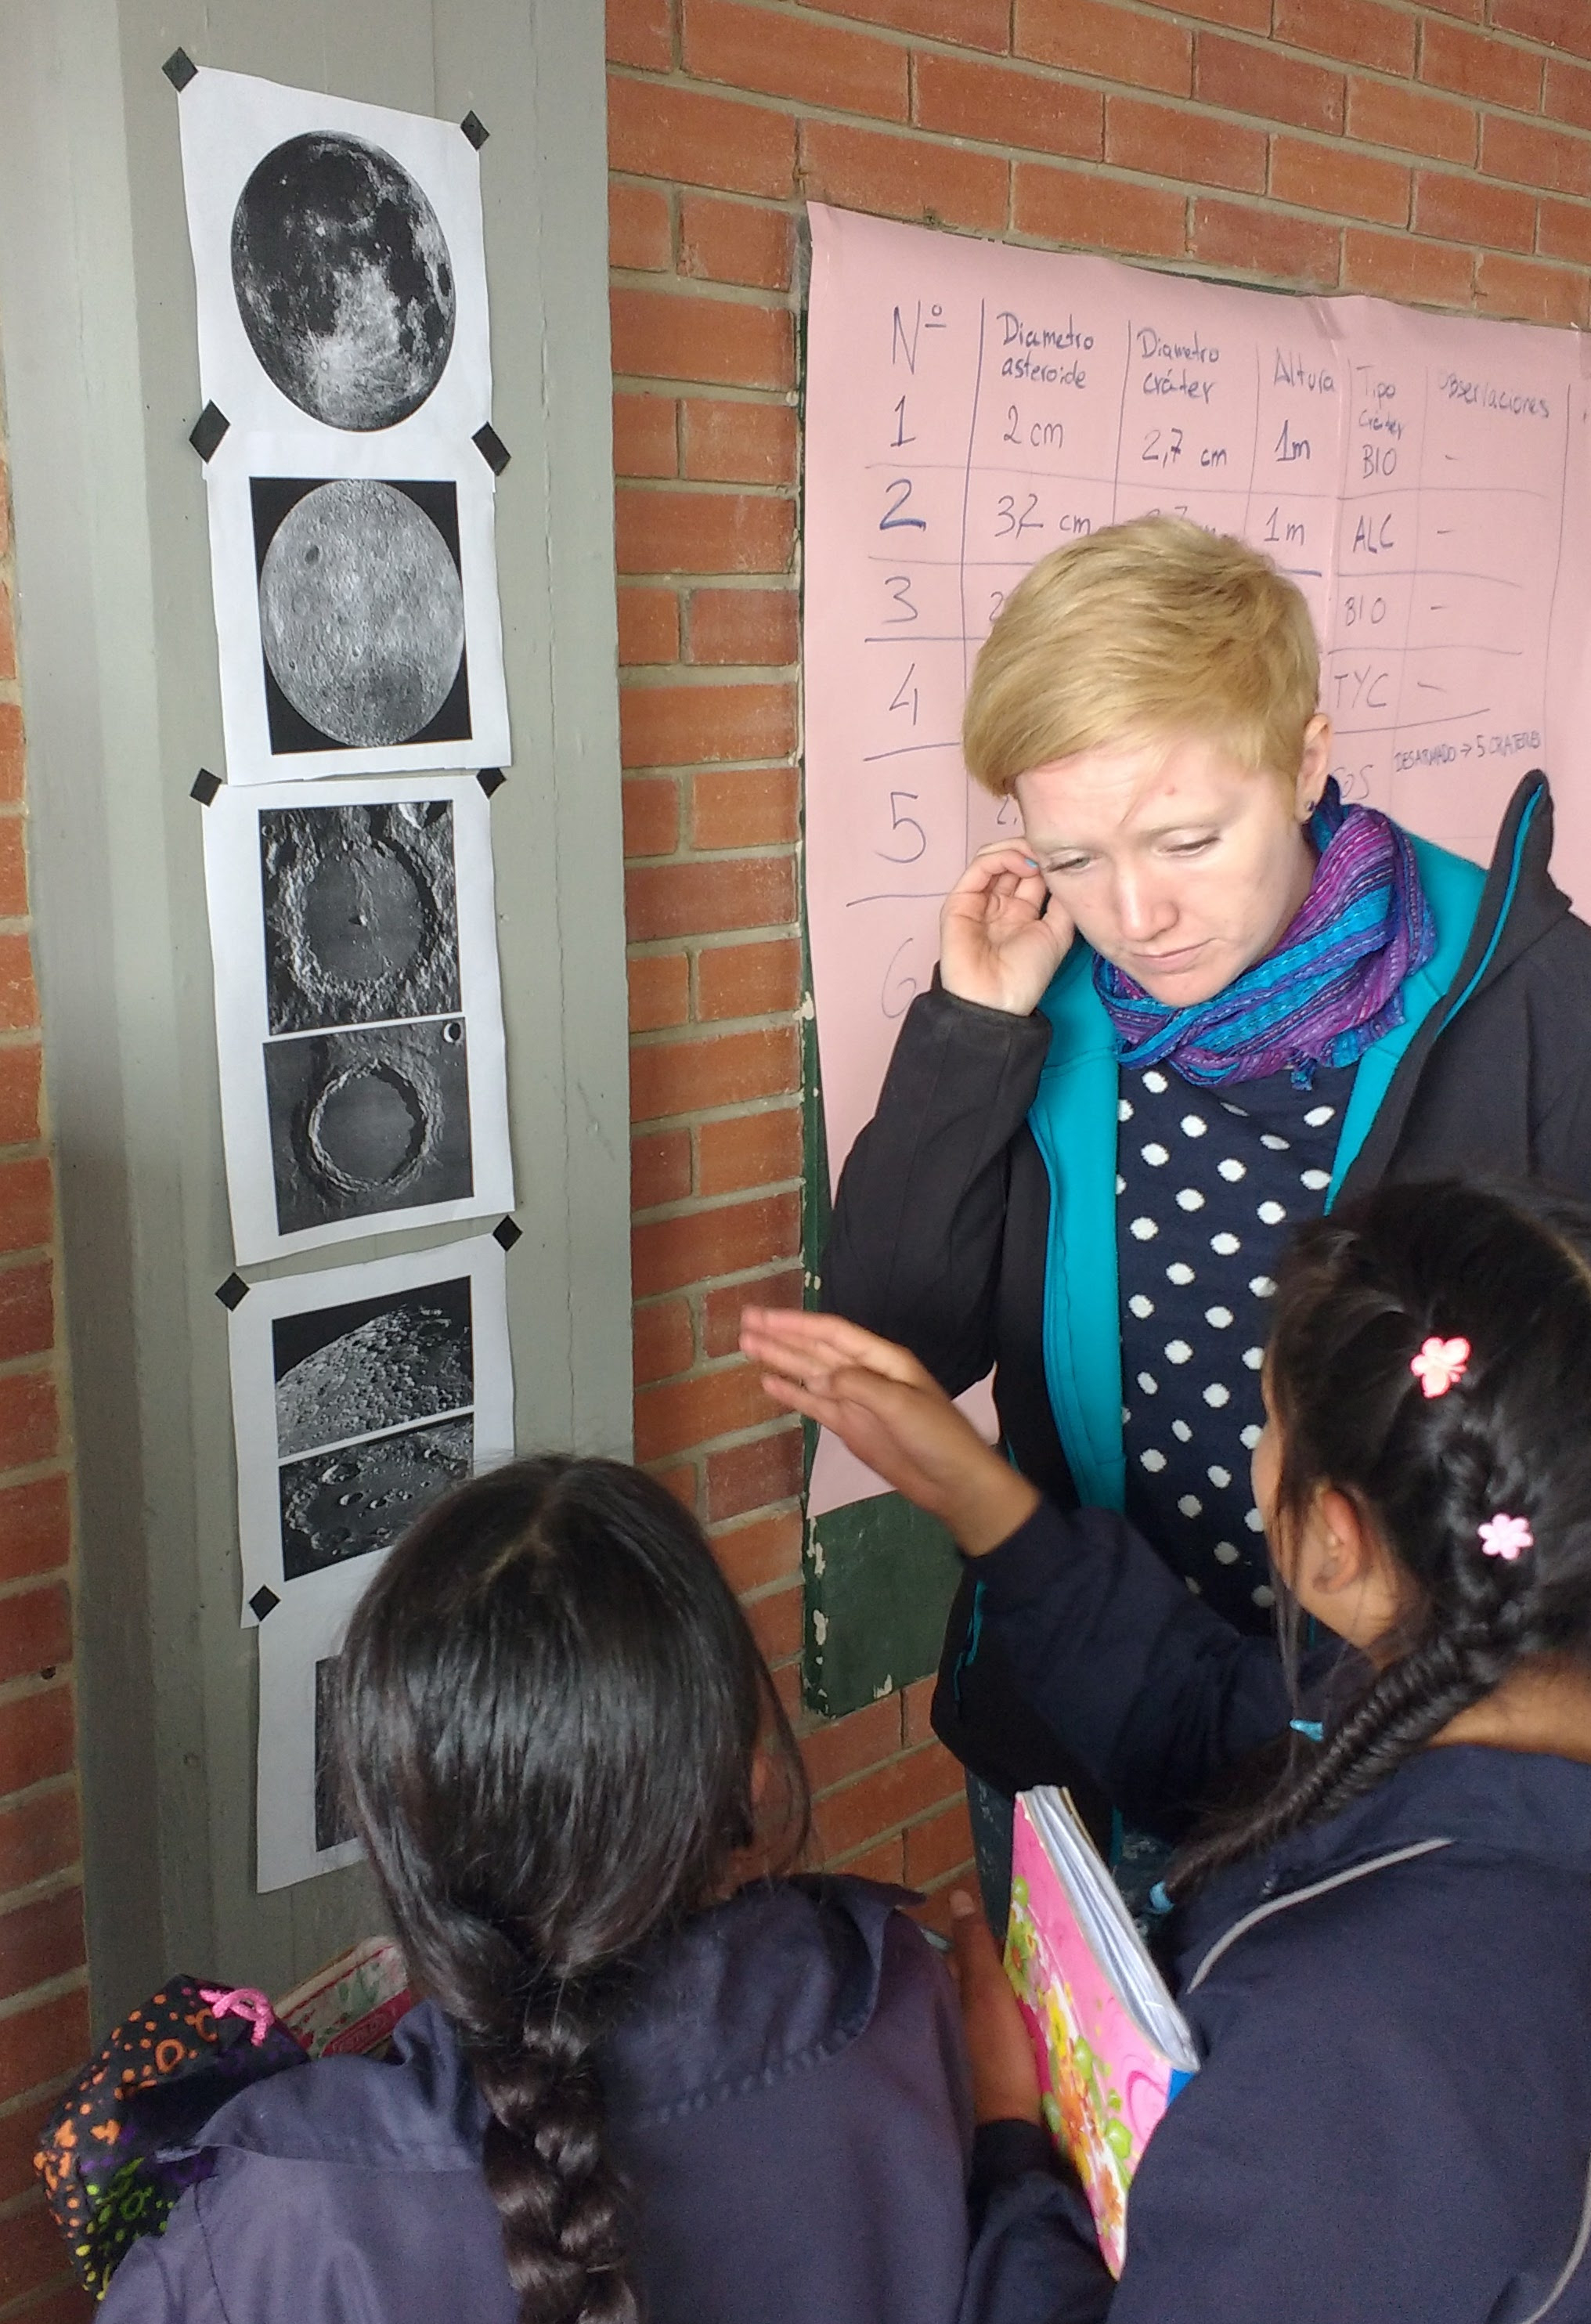
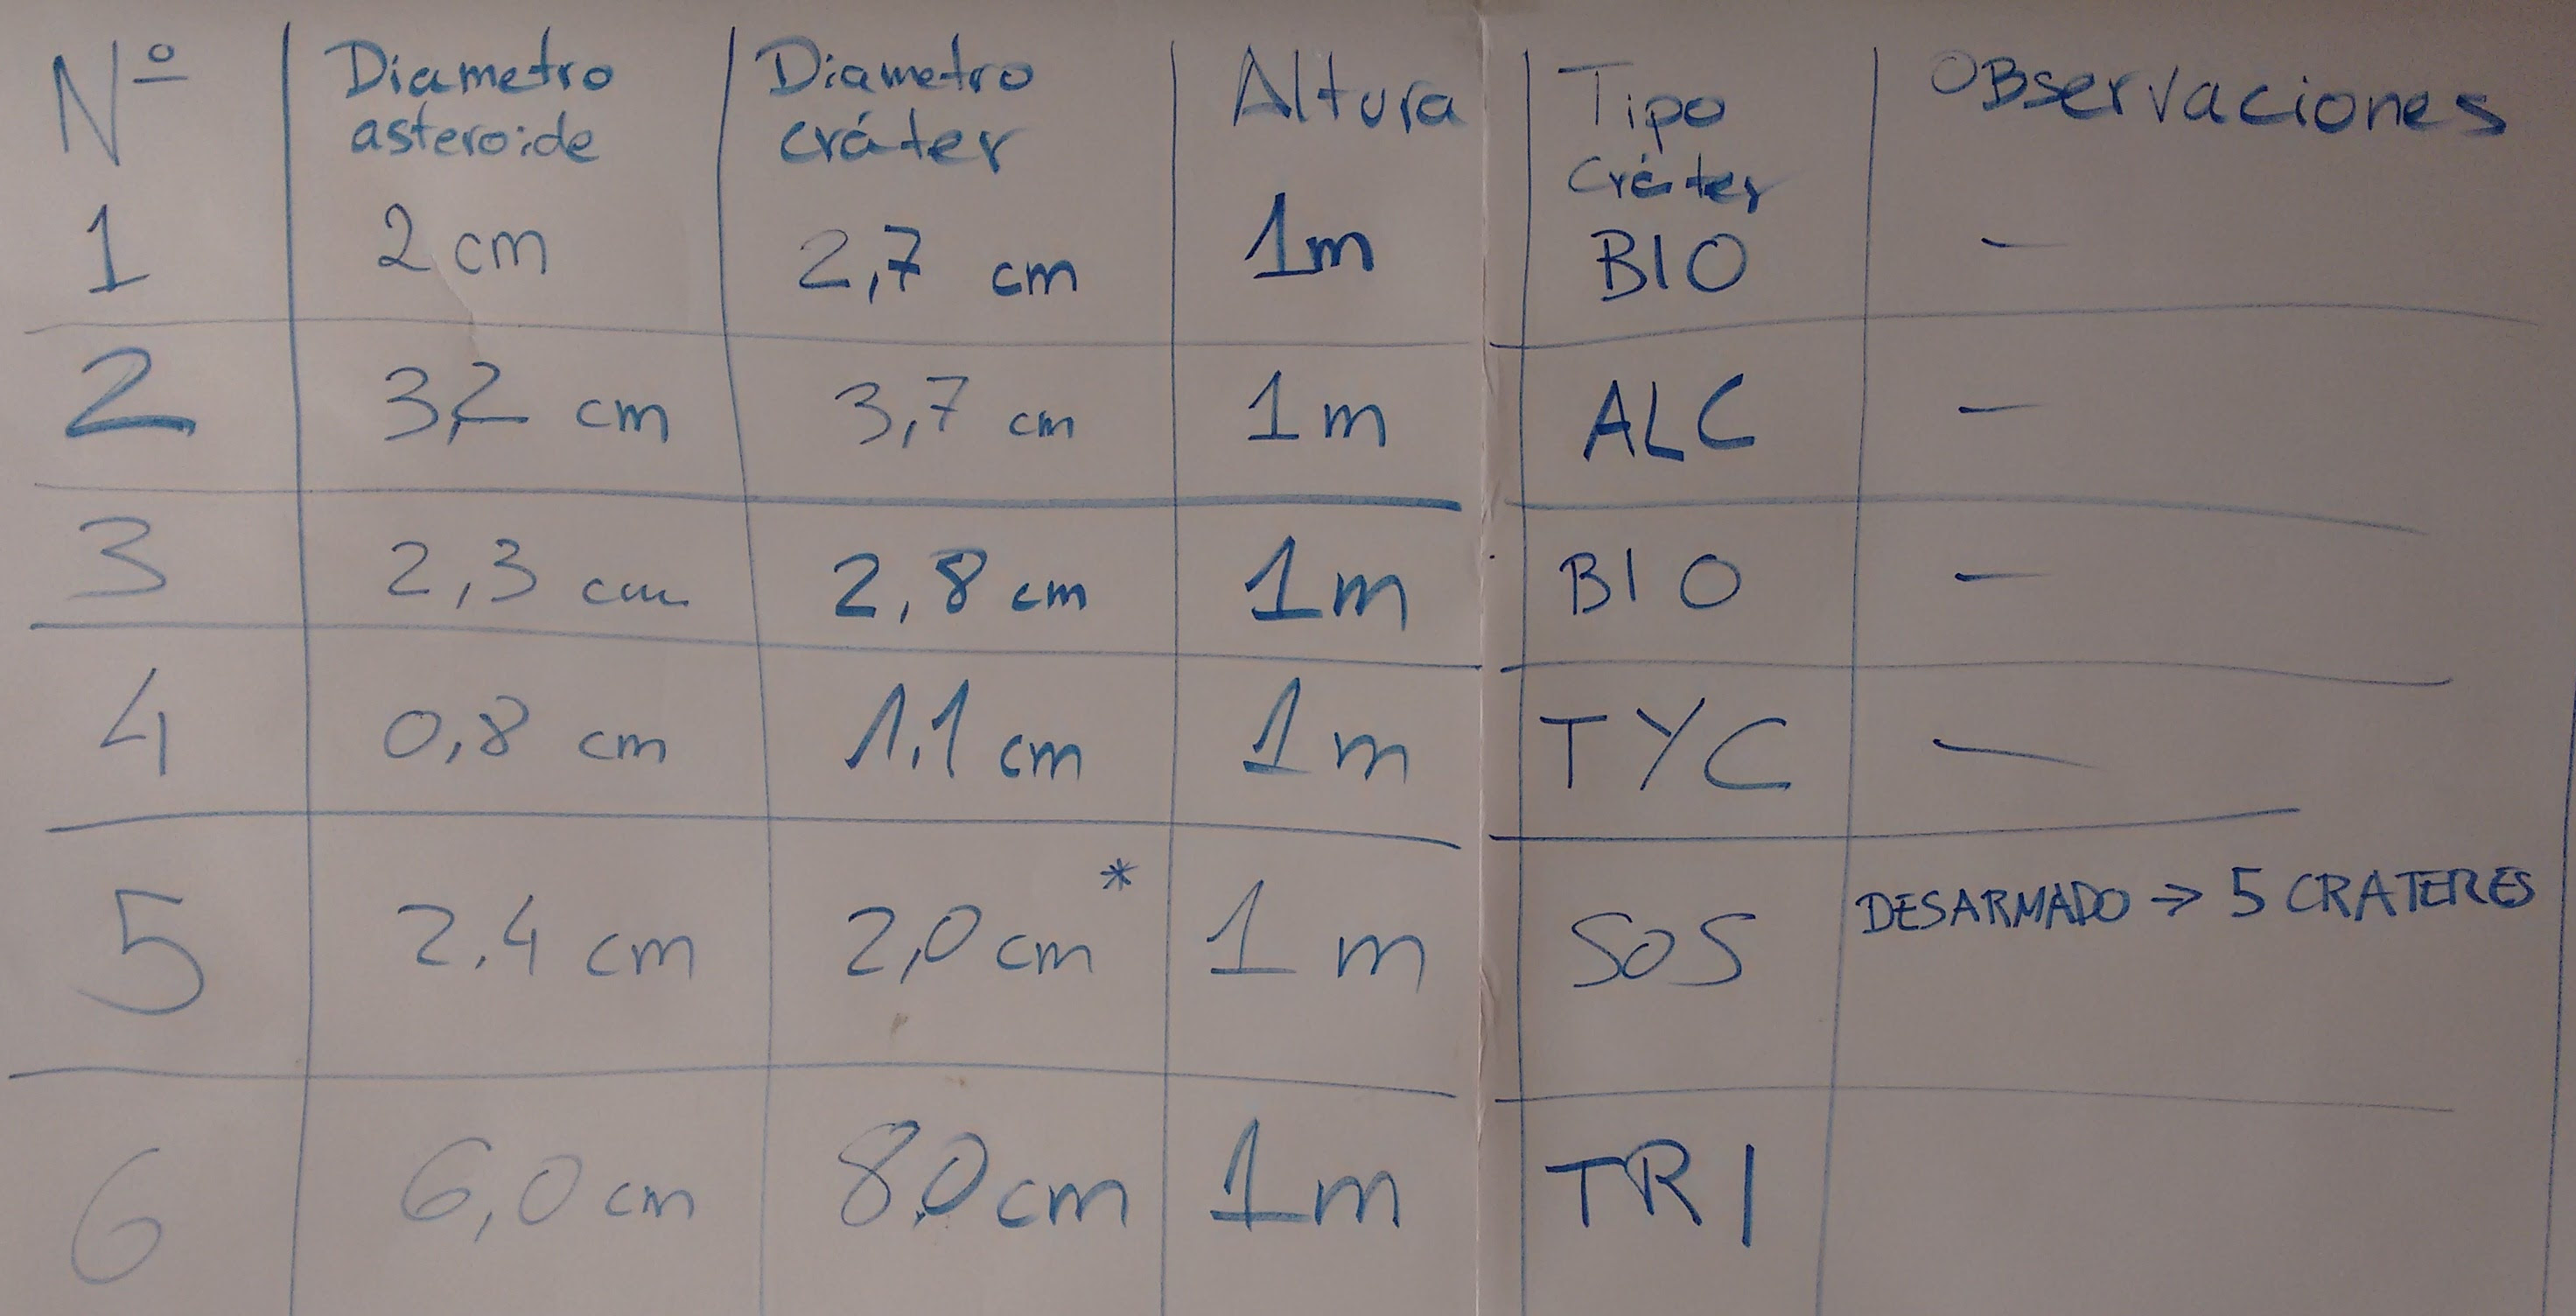
- Making Craters. Each group had to elect one person to be the asteroid launcher. This had to be done by making a decision together, like a good scientific group. Using a box of flour, with a thing covering of cocoa powder to simulate the lunar surface we dropped the asteroid from the height of 1m. That scientific team then had to measure the width of the crater, the width of the asteroid, record these measurements in a table and take not of any other observations. All measurements and observations had to be shared with the entire class who then had to record them along with the scientific team name (α,β,γ,δ,ε)
- Comparing with lunar crater. The laboratory craters were compared with the craters images of the lunar crater. Can we make craters like those on the moon? So we think asteroids like these could have made these craters? We also asked the children to classify the crater according to lunar crater type. This was probably the least scientific part but was successful in getting the kids to discuss the features of the craters and come to a unanimous agreement.
- Measuring the asteroids and craters was good to get them to practice measuring objects with a ruler.
- The children would get very excited when an asteroid would be dropped and they would all instantly want to see what the crater looked like. Perhaps a lunar surface per group would be better, but that would require more supervision or more supervisors.
- Each scientific team took turns to launch the asteroid, record, compare and report to the class. This was quite time consuming.
- In the older classes we included an asteroid that crumbled after launch. In this case the resulting crater was smaller than the original asteroid. This resulted in an outlier in our data which provided a discussion point in the following class.
Activities
Thoughts and Improvements.
Class III.
During this class we went over what we completed in the previous class, why we did it and what we found. We then began to plot the data on the board as they drew their own graphs. This took time as the younger classes had not done a lot of this. However we were successful. We called volunteers up to the board to mark the data points, asking the rest of the class to make sure the data point was in the correct position. We then discussed what we could learn from the graph i.e. bigger asteroids make bigger craters, or bigger craters come from bigger asteroids.
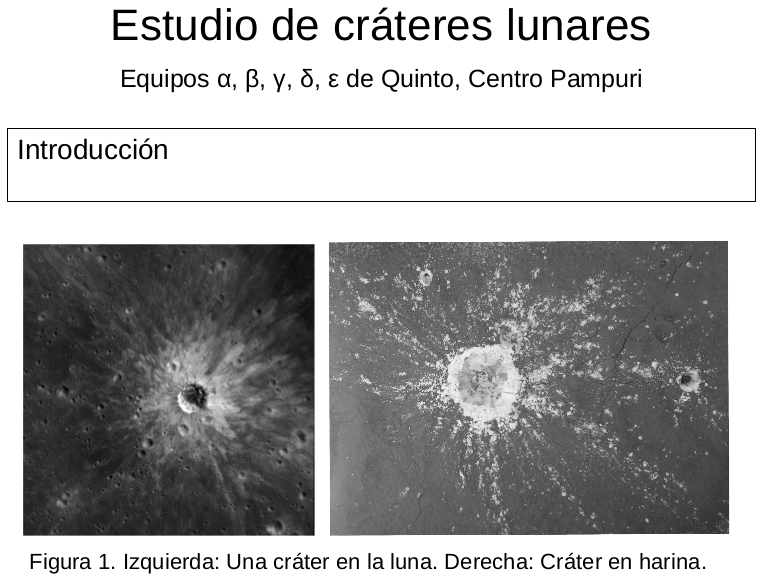
After completing the graph, we began filling in the scientific report. For this we made up a four page outline for the class which included, introduction, method, results with table and graph, images of craters compared to lunar craters and conclusions. Talking our way through the different sections, and filling them out together took some time, but I think this was very useful to cement the ideas for the children and to get them to think about the concepts again.
-
Reports
- A copy of the class report can be found here (given to class) and here (with data). Both in Spanish. One was given to each child. They glued their graph of the measurements into the report, and filled out the table. The rest of the report was then filled out together.
-
Thoughts and Improvements
- A few of the children did very well in coming up with very good conclusions from the experiments. Other children really struggled, and did not seem to be able to come up or think of the conclusions themselves. Perhaps having more time for this class would have been helpful.
Finding planets
The pace of the older classes was a little faster, and so we had some time to cover planet hunting with them. The Kepler website has some good resources and example light curves which I used in this class. They can be found here, with a detailed (and long) class plan here.
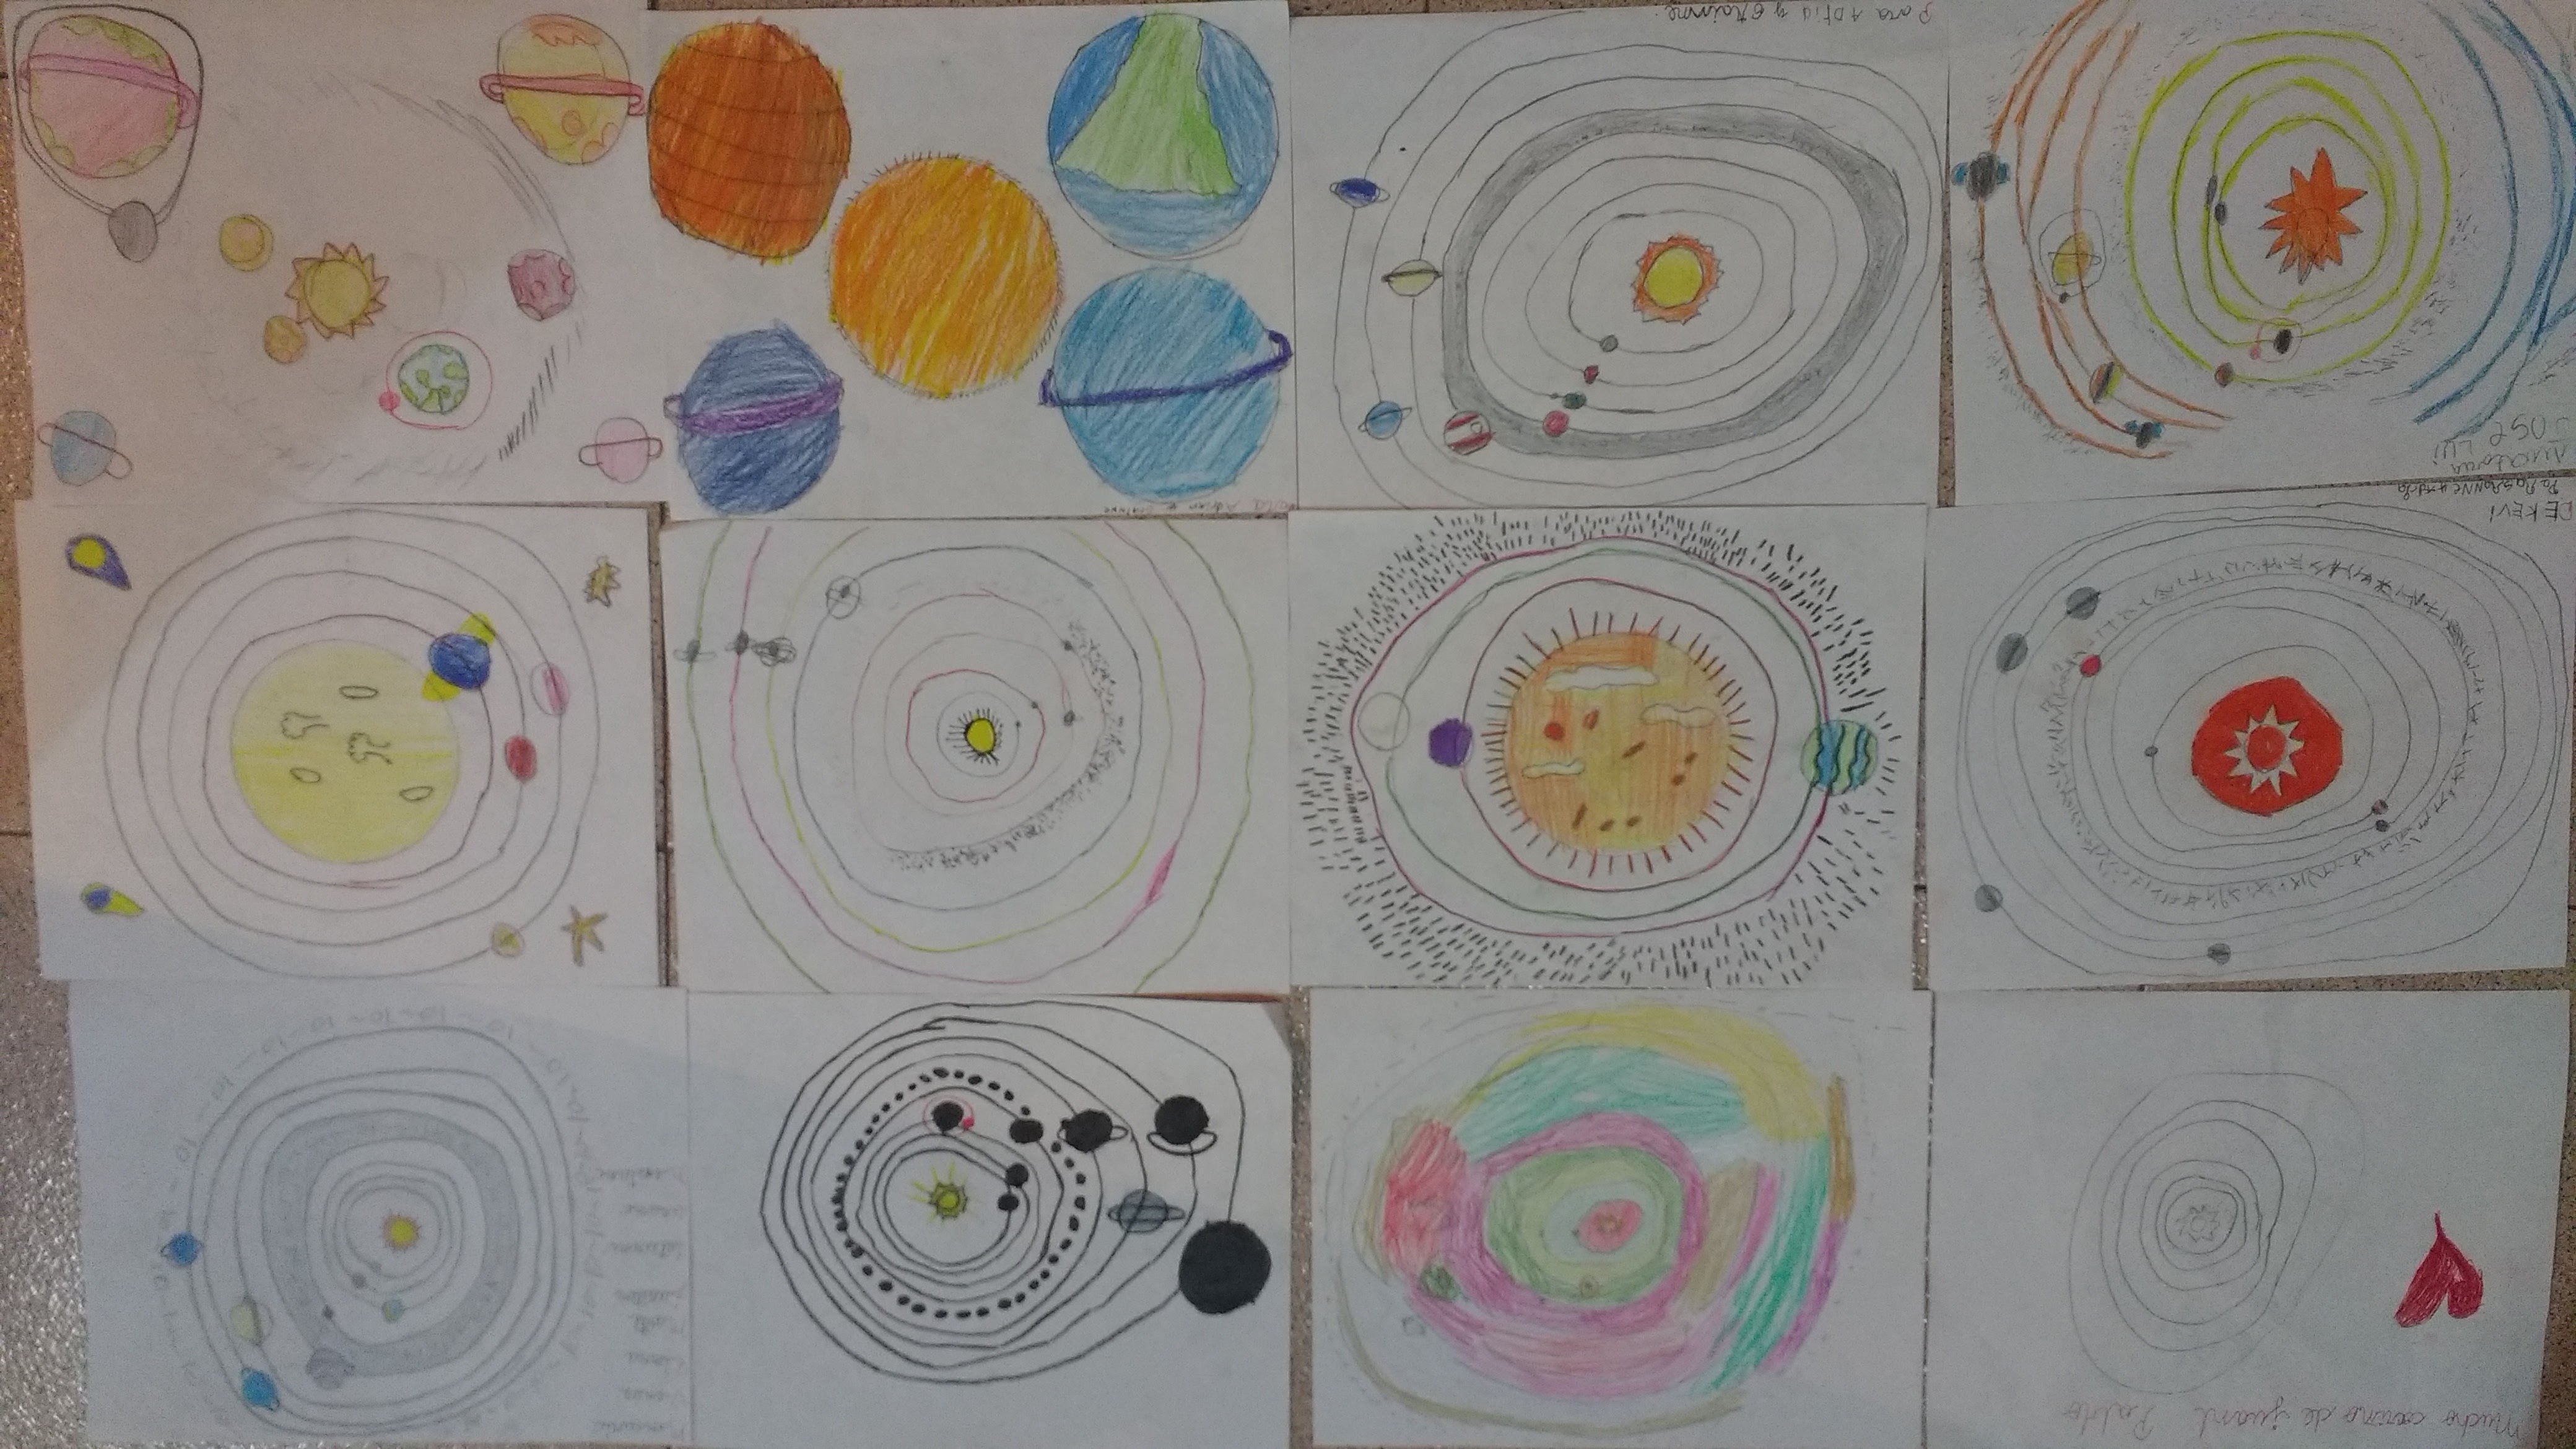
Class I. The first part of the session we spent talking about our solar system. We went through the planets talking about their sizes, orbits, moons, surface conditions, making comparisons to earth. We introduced the concept of the astronomical unit. We recorded all the measurements for each planet, size, orbit, radius, moons in a table while discussing the topic.
We then discussed solar eclipses, what happens when the moon travels between the sun and the earth. What would this look like if we made a graph of the light coming from the sun? What would this graph look like if the moon was smaller? What if it was further away? In this way we began to introduce transits and light curves.
Class II. We talked shortly about transits again this time bringing in the idea of viewing angle. We then used cleaned Kepler light curves to look for planets around these stars. We identified where the transits occurred in the light curve, found the period of the planet. We began with light curves of star with only one planet and moved on to look at transit light curves of stars with multiple orbiting planets. We did the first couple in class together, and then allowed them free time to fill in the table with the periods of the planets themselves while moving around the room to help.
-
Thoughts and Improvements
- There was mixed responses from the children with this class. They were not as enthusiastic about planet hunting as I thought they might be. It was a good opportunity to show them real stellar light curves, and the majority of them understood this point however they were not as engaged with this material.
- A lot of the students seem to struggle with the concept of the period, perhaps different wording would of helped, or else a little more time explaining what multiple transits would look like in a light curve.
- Working in pairs worked well for this class as they did help each other with the activities.
- In order to help them further with the concepts, doing a few more examples together in the class would have been good. Showing the light curves on the board as they saw them on the paper in front of them would of been helpful in pointing out the different transit features as well (no projection resource was available at the time).
Introduction to Coding
These activities were lead my colleague. We began by emphasising the need for coding in many different aspects of science and life. The resources available at code.org were invaluable for these classes. We began with a class on how computers think, and using pen and paper and working in pairs, the children had to write programs for each other to draw specific images. This was all done using graph paper and such commands as up,down,left,right,paint. At the end of this class we were able to introduce the concept of loops.
The second class was held in the computer room, where we worked on such exercises as these. The exercises involve giving a sequence of commands to small characters to get to the end of a maze or draw a certain step. The logic and functions are slowly built up, from exercise to exercise. The children really enjoyed the 'game' aspect of these exercises. We had them working in pairs, and they did very well in getting through many exercises. There was the added benefit that they could continue with these exercises at home.